Master Innovation

Explore Blog

Prototyping: The Design Process to Pressure-Test Ideas

Pressure-Test your Design Process with these simple steps

July 11, 2018

prototyping_design_process_hero-1


No great idea is born in a vacuum. For two reasons:

  1. The elements that make up a great idea are not always visible from the start.
  2. New great ideas come to life when they collide and mix with existing ideas.
Business strategy often suggests determining a goal, or endpoint, and working backwards to develop an action plan to get there. When it comes to cultivating original and impactful ideas, it’s nearly impossible to work backwards because you don’t yet know what shape the endpoint will take.
Scientists deal with this type of uncertainty too. When they start out, they don’t know the exact formula or process that will work in the end. But through systematic observation, experimentation, measurement, and analysis (the scientific method) scientists have arrived at breakthrough knowledge like vaccines, DNA, and the Theory of Relativity.

Great ideas are also not formed in a single spark of isolated genius. In his TED talk, Steven Johnson describes how the theory of natural selection was outlined in Darwin’s notebooks months before the moment Darwin reports having his ‘eureka’ moment of clarity. Even though there were hints in plain sight all along, the full idea needed time and commixing with other thinking to finally clearly emerge.

Similar to scientific discoveries, impactful ideas are developed into their most useful final forms through experimentation, interaction and feedback. Getting to the endpoint is sometimes messy and unpredictable, but luckily methodologies like Human-Centered Design provide concrete tools to navigate the path.

A key tool in design thinking is prototyping to develop new and meaningful ideas with early testing and experimentation. IDEO founders, Tom and David Kelley, describe why prototyping is so helpful:

"The act of creating forces you to ask questions and make choices. It also gives you something you can show to and talk about with other people."

Making your ideas tangible, even before they feel ready to be shared, is the fastest and most reliable way to gather feedback early on about what works and what doesn’t.

Nathalie Collins, senior lead designer at IDEO.org, describes prototyping as “a way to think” where something is brought “from a place of theory to a place of tangibility.” By taking the approach of frequent testing, gathering feedback, and iterative learning, your idea follows a trajectory of continuous improvement until it has ‘succeeded’ (or generates value in a predictable and repeatable fashion).

prototyping_design_process_dlight

Prototyping can take many forms; the goal of this article is to provide enough context and examples to inspire you to add prototyping to your toolbox for creating social change.

How Prototypes Evolve Through the Development of an Idea

There is a saying in design thinking:

First you want to design the right thing, then design the thing right.

This is the simplest way to understand how prototyping evolves over the lifetime of a project.
At the beginning, the priority of prototyping is to fully understand the problem you wish to solve. Only once you’re sure about the problem that most needs addressing should you move on to design a solution for it. If you skip over the first half, you run the risk of building something amazing that no one wants or needs!

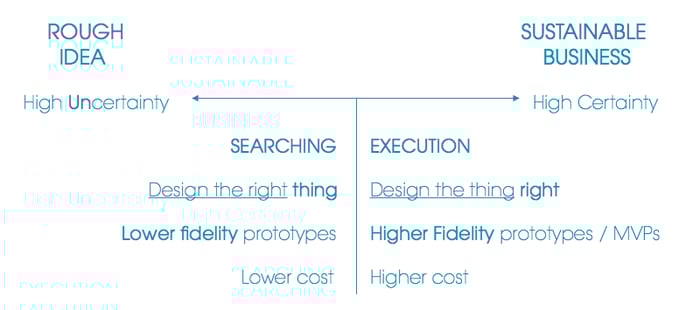
Alex Osterwalder of Strategyzer frames the process of developing a rough idea into a sustainable business using a spectrum like the one below.

prototyping_design_process_diagram

Along the spectrum, experimentation helps you ‘search’ for the right idea in early stages, and best ‘execute’ that idea in later stages.
Generally in the earlier stages, prototypes should be low cost and low fidelity, meaning they have minimal detail and functionality, if any. As the idea develops, and with additional feedback from your users, the prototype will gradually evolve into a higher fidelity version that incorporates more detail and functionality.
Nathalie Collin’s advice for noticing when it’s time to evolve into a higher fidelity prototype is when “people start giving you feedback on smaller details. That means you can probably move to the next stage because you are reaching a point of refinement.”
At this point, you might be thinking that prototyping sounds very similar to the Minimum Viable Product (MVP) as described in Lean methodology. One way to compare the two is to describe an MVP as a later stage prototype.

Alex Iskold describes the difference as: “an MVP is good enough, and can be improved to be great one day. Prototype isn’t good enough.” This means a prototype is useful for testing specific questions as the product or service is being developed, but an MVP should be sophisticated enough to deliver on its promise of value. After all, this usefulness is what makes it viable.

Prototypes are the tools to help you prove a concept and MVP’s help you refine it.

It’s important to not get too attached to your ideas before they are proven, which is much easier before you have invested too much time and resources. For prototyping, Tom and David Kelley highlight, “Besides speeding up that process of experimentation, prototypes are easy to throw away when they fail. Creativity requires cycling lots of ideas. The more you invest in your prototype and the closer to “final” it is, the harder it is to let go of a concept that’s not working.”
Now that you know what to expect, let’s look at how to put prototyping into action to bring your impactful idea to life.

The Process for Developing Fail-Proof Ideas with Prototyping

Prototyping starts by determining what to build, then follows by making it real, gathering feedback from people interacting with it, and finally iterating and repeating the process until you have a product or service that is desirable to your customers, operationally feasible, and financially viable.

STEP #1 - DETERMINE WHAT TO PROTOTYPE

As discussed, your idea faces the most uncertainty at the beginning. At this stage, your primary job as steward of this original idea is to prioritize which questions will provide the insight that is most critical to the success of your idea.

IDEO suggests starting by writing down all of the elements of your idea. For each, list the questions you have. In a similar way, Strategyzer recommends making a list of all of your assumptions, which are the statements that need to be true in order for this idea to deliver the results you envision.

Consider which questions and assumptions are the most crucial for your idea to work and keep these in mind as you build your first prototypes.

When describing the process of validating a business model through experimentation, Strategyzer recommends testing your biggest questions in this order:
  1. Start by testing hypotheses that have to do with the problems (pains), activities (jobs) or goals (gains) the potential customer faces.
  2. Only after you have a good understanding of their perspective should you move onto validating the solution itself. In other words, confirming the solution (product or service) you have in mind will deliver value that is meaningful and desirable to your customers.
  3. When the best solution to serve your customers is clear, the final phase of questions to explore is around how you will do it.
Some ideas to keep in mind at this stage are:
  • Keep it simple: focus on one element of your idea at a time.
  • Ask one question at a time: each test will provide information to add to the big picture, and your prototypes will get more sophisticated over time to incorporate all the learning.
According to Nathalie Collins, the most common mistake first time prototypers make is thinking too big:
“People assume that prototypes need to be their best guess at what a product or service is going to be. So they try to prototype the entire thing instead of asking very specific questions that a prototype can help to answer. The question you want to answer is: 'What can we learn from this and what does it inspire us to do next?' To get an answer you just have to try something.”
One way to stay focused as you develop prototypes is to consider if there are constraints to keep in mind throughout the process.
With the help of the Acumen Academy prototyping course, a team of university students in Tulsa, Oklahoma, wanted to design new technology to make processing cashews in Carrilho, Brazil, safer, more comfortable, and more productive.
With over half of the population of Carrilho relying on it for their livelihoods, manually processing cashews over fire is the main economic driver for the town.
As the class from Tulsa envisioned a safer and more efficient way to process the cashews, they prototyped new stove designs with the following constraints in mind:
  • It needed to be made from local materials only (i.e. no soldering metal)
  • It needed to be ergonomic and comfortable to use
  • It needed to emit little to no smoke
  • It needed to collect the most cashew oil possible
  • The costs needed to be under $100

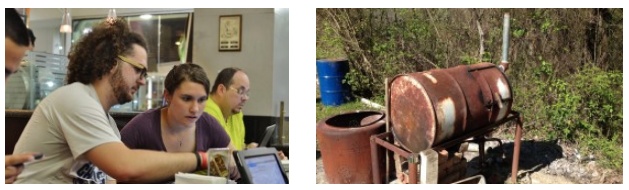
The students built and tested several versions before arriving at a stove design that extracted 12% of the oil (out of available 15%), up from only 1-3% collected from the first prototype. By designing with constraints they were able to focus their prototyping process to address the most important areas. The new stoves were expected to minimize respiratory health issues and help increase villagers’ household income by 10-20%.

prototyping_design_process_cashew

STEP #2 - MAKE IT REAL

Now that you are clear on your purpose, it’s time to start making.
The more variations of prototypes you create, and the faster you iterate upon what you put into the hands of your users, the better. Remember that a prototype doesn’t need to perfectly replicate all aspects of the experience. Keep it simple and rough to start, without worrying too much about the finer details.
With a little creativity, it’s possible to prototype even the most complex products and services. After Typhoon Haiyain in the Philippines, IDEO.org in partnership with Mercy Corps, BPI Globe BanKO and CauseLabs, were developing a mobile loan product to help those who couldn’t access traditional banking to rebuild.
They designed a ‘Loan Surprise’ game to field test how people reacted to various types of loan options. People would roll dice to land on a specific loan scenario and be asked ‘would you take this loan or not?’. This simple prototype allowed the designers to engage people in a low-stakes conversation about their feelings and perceptions of loan options. On day two, the team adjusted the game board to test how people responded to similar loans explained with different names.
As you get further into the process you can further refine and evolve your prototype to reflect the new information you gather in the field in Step #3.
Here’s a summary video from a past Acumen Academy prototyping course team who created a live prototype to encourage students to take the stairs instead of the elevator.

Close

STEP #3 - GET FEEDBACK

At this stage, it’s all about getting your prototype into the hands of the end users and seeing how they interact with it. You’ll want to use a combination of conversation, questions, and observation to glean the insights that will inform the next iteration of your idea.
As you collect feedback from users interacting with your prototype you want to be careful not to inadvertently set an expectation for users to tell you what you want to hear. Let them know you care about their perspective, and are concerned with designing something that is truly helpful for them.
Another tip from Tim and David Kelley is the advantage of testing variations: “Multiple alternatives also encourage good, honest feedback about your ideas. If you go in with only one prototype, it limits your options. With multiple prototypes, you can have a frank discussion about the relative strengths and weaknesses of each.”
Former Acumen Academy volunteer and course taker worked with a team in Stockholm to design a solution to help new refugees take part in their new community even while they are in the 12 to 24-month state of limbo as they wait on status of asylum applications. The solution the team developed was a welcome card, aided by RFID technology, that would give refugees temporary identification and access to community services like public transportation and cultural events.

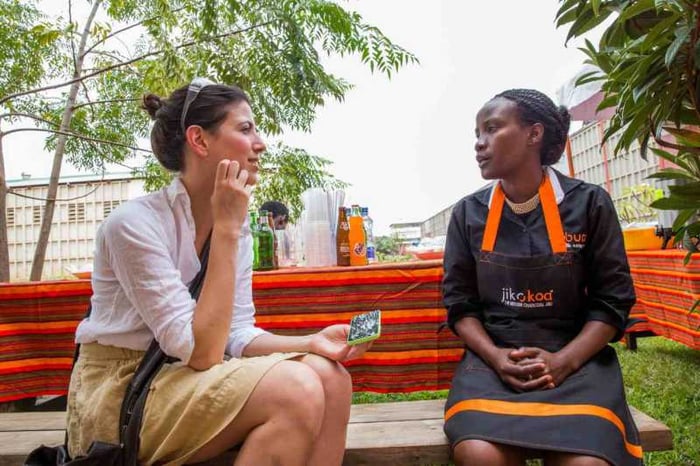
With a mock-up prototype in hand, the team conducted several interviews to gain feedback from the end users. From this process, they learned that privacy and security were a key concern for refugees. As helpful as RFID technology was for connecting into Stockholm infrastructure, for refugees concerned with privacy, carrying a card that made their exact location known to the service providers made them uneasy. Learning this information early in the design process saved the team countless hours and resources that might have been spent developing out a flawed solution.

prototyping_design_process_jikokoa

STEP #4 - ITERATE & REPEAT

As you observe how people engage with your prototypes and collect their feedback, it’s time to integrate that learning into the next iteration of your idea.
With each feedback cycle, if it’s positive, it might make sense to increase the complexity of the prototype. Or, if the feedback is negative, it’s time to go back to the drawing board (literally) and begin early stage prototyping in a new direction.
In a past pop-up course Acumen Academy ran with Alex Osterwalder, the creator of the Business Model Canvas, he gives this advice:
“Sketch out a loose set of hypotheses and immediately get out of the building and test whether the pains you think your customers or beneficiaries have are actually true. The majority of the time you’ll be wrong so you’ll need to go back to the drawing board... If you do this right you will be prototyping a lot of different business models and value propositions and throwing many of them out as you learn what is working.”
A team who took part in the Acumen Academy prototyping course shared their experience of iterating multiple versions of board games to help teach kids math. To keep things simple and cost-effective, they based their new game on a popular local game by adapting existing cards and game pieces. Building upon an existing game brought the added benefit that the local kids already knew the basic game structure and rules.
Once the first game prototypes were in the hands of the kids, they quickly learned how their game needed to be improved. For example, they had included an image of a drawbridge but the kids living in the slum had never seen a drawbridge before. The team’s quick and easy prototype allowed them to better understand their users, the kids, and learn what needed to be improved in the next version of the game for it to be even more impactful.

Prototyping Techniques

There are plenty of creative ways to test and prototype your ideas. The best approach will depend on many of the factors previously discussed. The choice can also simply be following the methods you are most drawn to and excited to implement.
Here’s a list of techniques, roughly in order from least resource intensive to most resource intensive:
  • Storyboard: a visual representation of a sequence of events or interactions. Rough sketches on sticky notes works perfectly to show what someone might be feeling, doing, or seeing. IDEO suggests brainstorming multiple options for each stage in the sequence on extra sticky notes so more variations of the storyboard can be easily visualized.
  • Role play: act out a customer/user scenario in person to test how your idea would work in action.
  • Bodystorm: a mix of role playing and brainstorming to use empathy to come up with new ideas.
  • Game / simulation: set up a game where users can interact with an idea; great for observing how people act in various contexts.
  • Make a physical survey: another idea from IDEO is to make a question tangible using a yes or no jar where people passing by can place their vote.
  • Concept art: an illustration of your idea to show to potential users to gather their first impressions and questions.
  • Non-working model: a 3D representation of a physical product using readily available materials without functionality; used to get a general idea of size and form.
  • Working model: a 3D representation of a physical product (using readily available materials) that has functionality similar to the end product.
  • Wireframe: a series of simple 2D sketches to show the main elements of an idea and how they fit together; often used to map out the components of an app or website in early stages.
  • Mock-up: a 2D design that looks finished but lacks full-functionality (like simulating clicking through a website).
  • Video / film: to act out or describe and show the idea in action.
  • If you need more inspiration, here’s another list of prototype examples.
Remember, these are just a sample of methods you can use to make your idea tangible with prototyping; get creative and come up with your own, or mix and match these to suit your needs!
You can keep it simple and creative. Here’s a playful example from a past Acumen Academy prototyping course team who prototyped a simple pop-up booth to help people passing by de-stress:

Watch Now

Close

For more support using prototypes to test new ideas and develop them into meaningful products and services, register for the next cohort of the Human-Centered Design 201: Prototyping course by IDEO.org and Acumen Academy. It’s a hands-on guide to making your ideas tangible quickly and cheaply. This course builds off one of the most popular Acumen Academy courses, developed with IDEO.org, Introduction to Human-Centered Design, which provides students with a framework to find new ways of solving problems, even when the way forward is unclear.
Danielle Sutton Headshot

Author

Danielle Sutton

Danielle Sutton is the Content Animator at Acumen where she surfaces stories to inspire and activate social entrepreneurs. In an age of information overload, she believes in learning 'the right thing at the right time' to intentionally design impactful social enterprises. You can usually find Danielle digging into the Acumen course library, playing in the mountains, or exploring marketing on The Sedge blog.